Andra Weber Creative
Design & Creative Development
awc_logo_2023_create_change.jpg

Create & Change

Posts tagged today
The Best Summer Dessert Of The Year Is Here!
rhubarb_pretzel_pie_sq.jpg

// hello friends -

Summer time is here! That means mother nature has turned up the heat, barbecue season is in full swing, and it’s time to rummage through our recipes to find the perfect warm weather treat.

Look no further.

Let’s cut to the chase.

Here is a cool and saccharine summer dessert that might just go down as the best recipe of Summer 2019. It’s a salty, sweet, buttery, sour treat that doesn’t require oodles of oven time:

Strawberry Rhubarb Pretzel Pie.

We could discuss how this pie might remind us of an old fashioned, delightful, fluffy, jello drenched, cream cheese delight that our grandma whipped up for summertime get togethers, or just like key lime pie, the whipped texture is a lovely complement to the heat a barbecue provides but I promised to go straight to the good stuff, so here is the recipe.

Strawberry Rhubarb Pretzel Pie

Serves 8 // Prep Time 1 hour // Cooling Time 3-4hours

Strawberry Rhubarb Filling:

  • 1 pound fresh strawberries washed, hulled, and cut in half

  • 1 pound fresh rhubarb stems chopped in 1/2 inch chunks

  • 1/2 cup granulated sugar

  • 1 cup water

  • 1 lemon

Pretzel Crust:

  • 1 cup + 2 tablespoons Snyder Of Hanover Butter Snap Pretzels® very finely ground

  • 3 tablespoons sugar

  • 7 tablespoons unsalted butter, melted

Cream Filling:

  • 1 -14 oz can sweetened condensed milk

  • 1 container (8 oz) frozen whipped topping, thawed
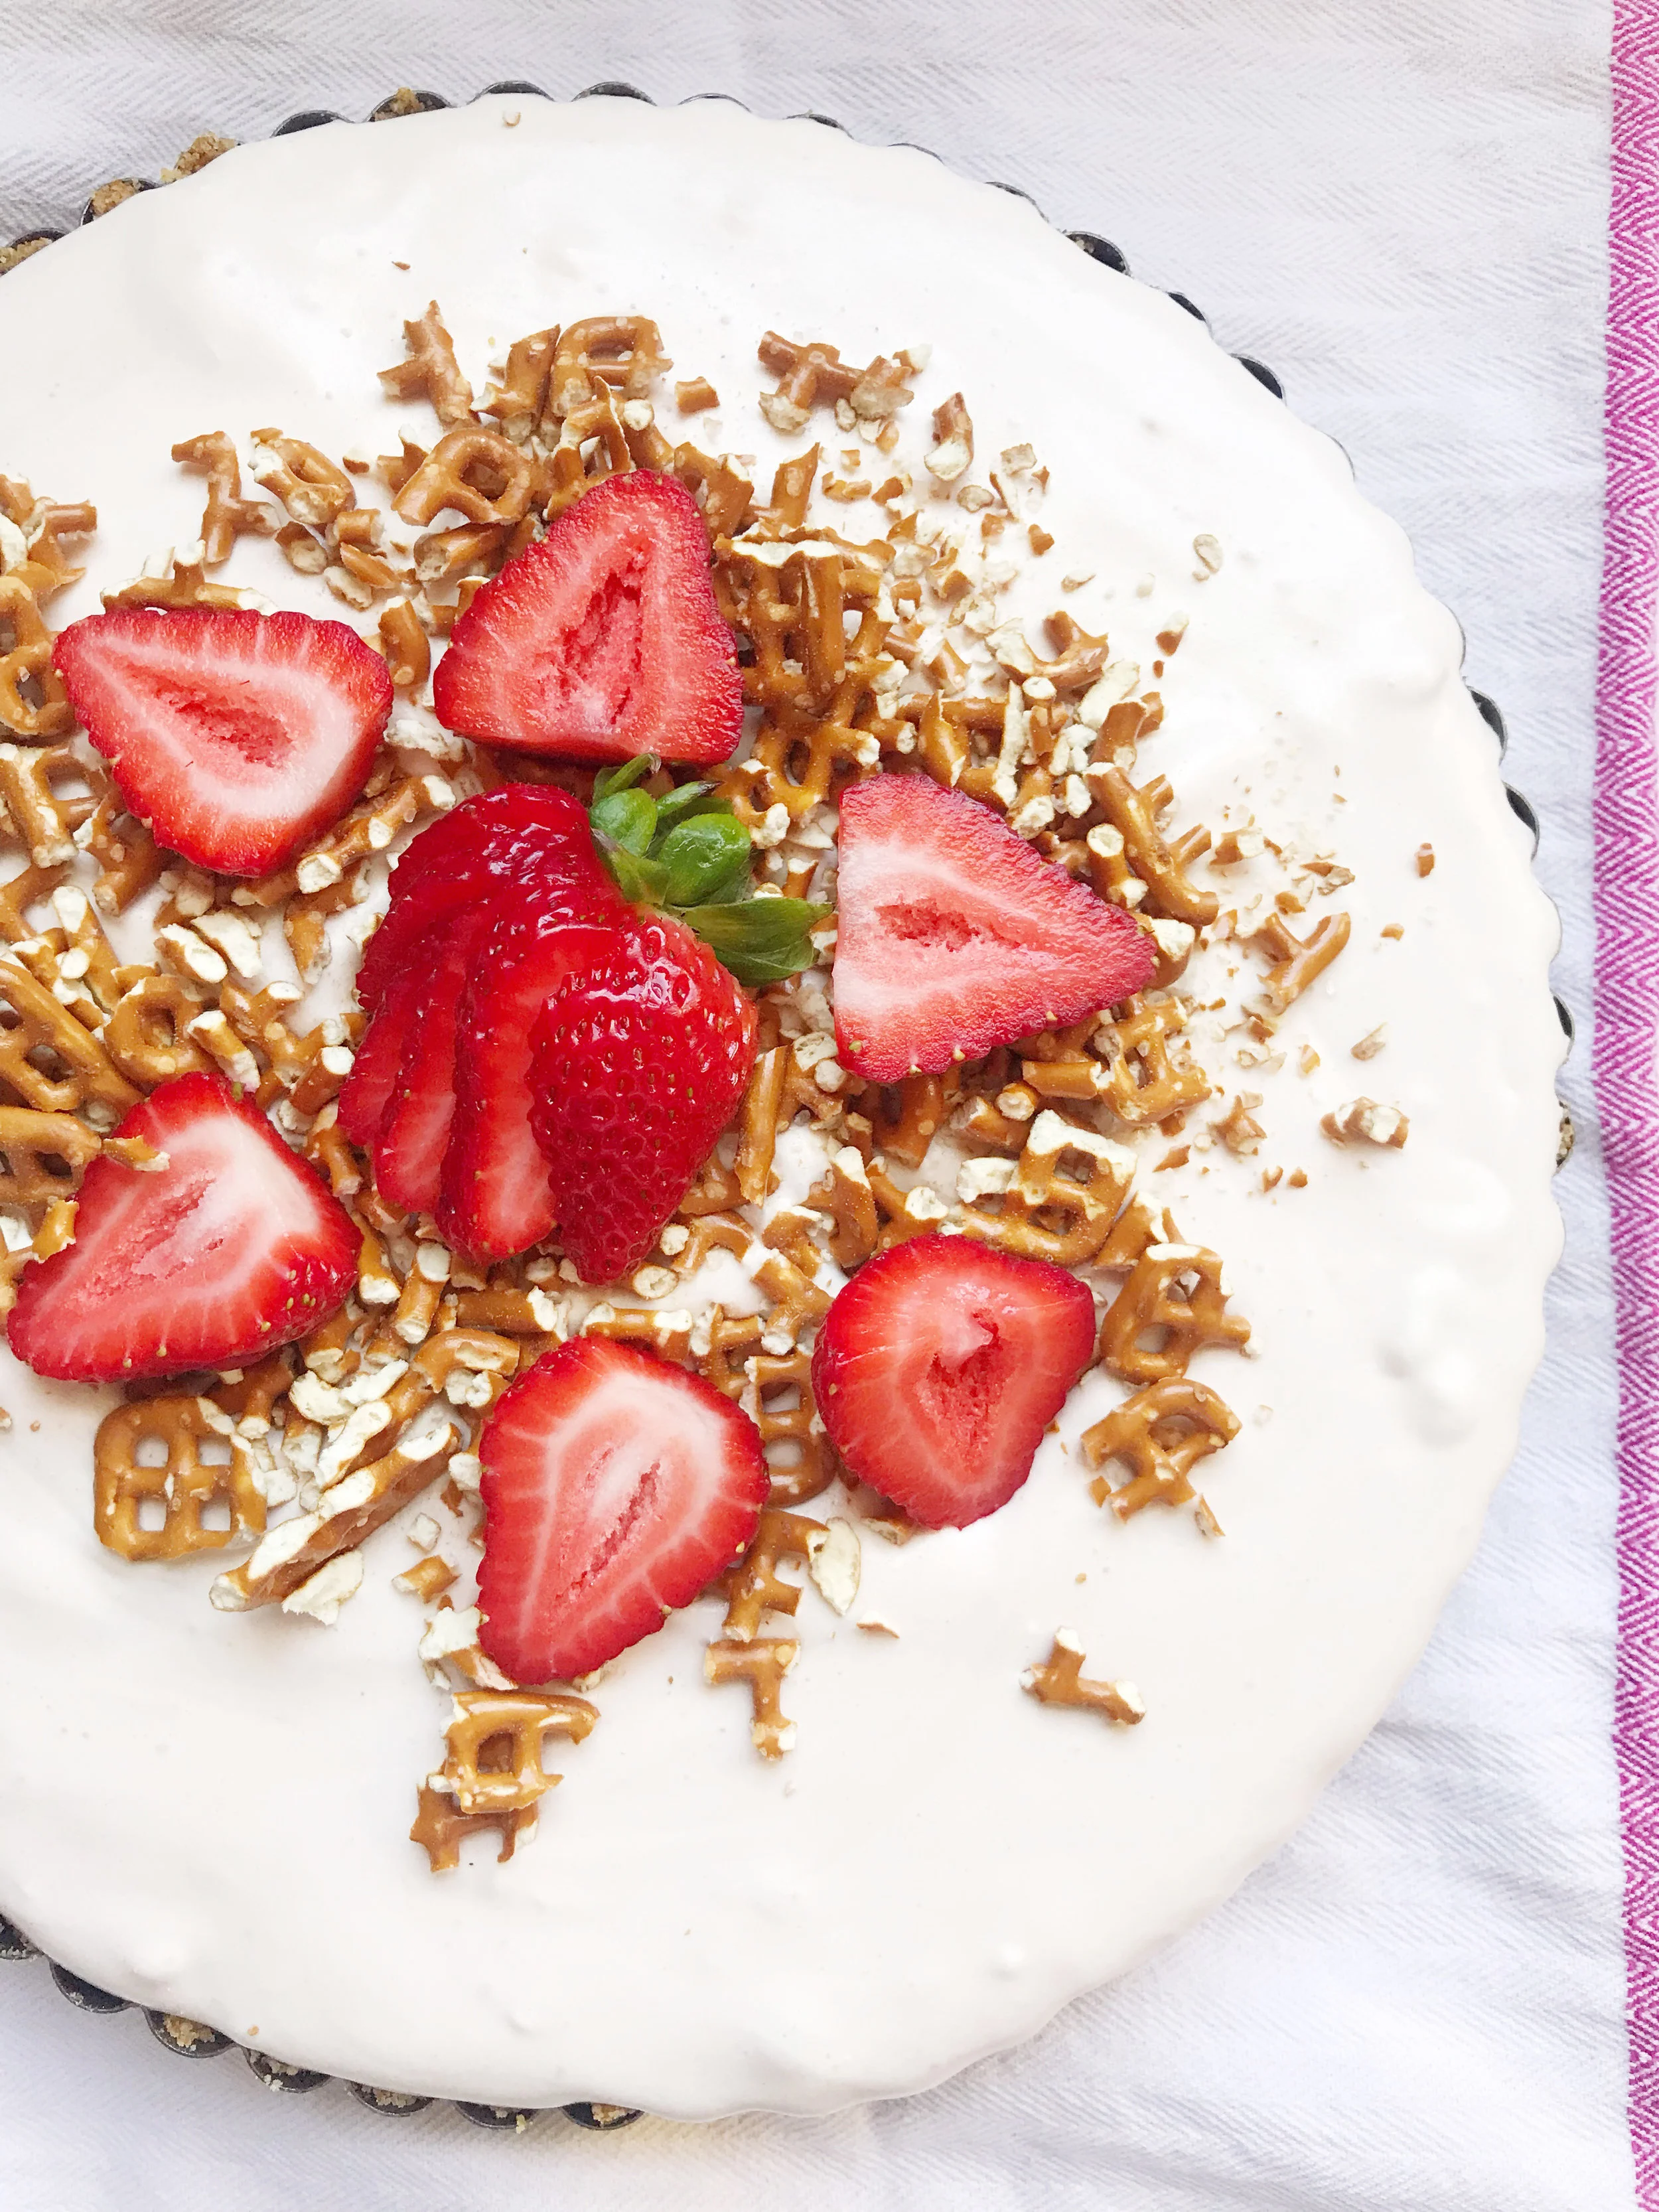
Garnish: (optional)

  • 3-5 strawberries

  • 10 pretzels crumbled

  • whipped topping

Step 1: Grease one 9-inch pie or tart pan and set aside. Preheat the oven to 350 degrees.

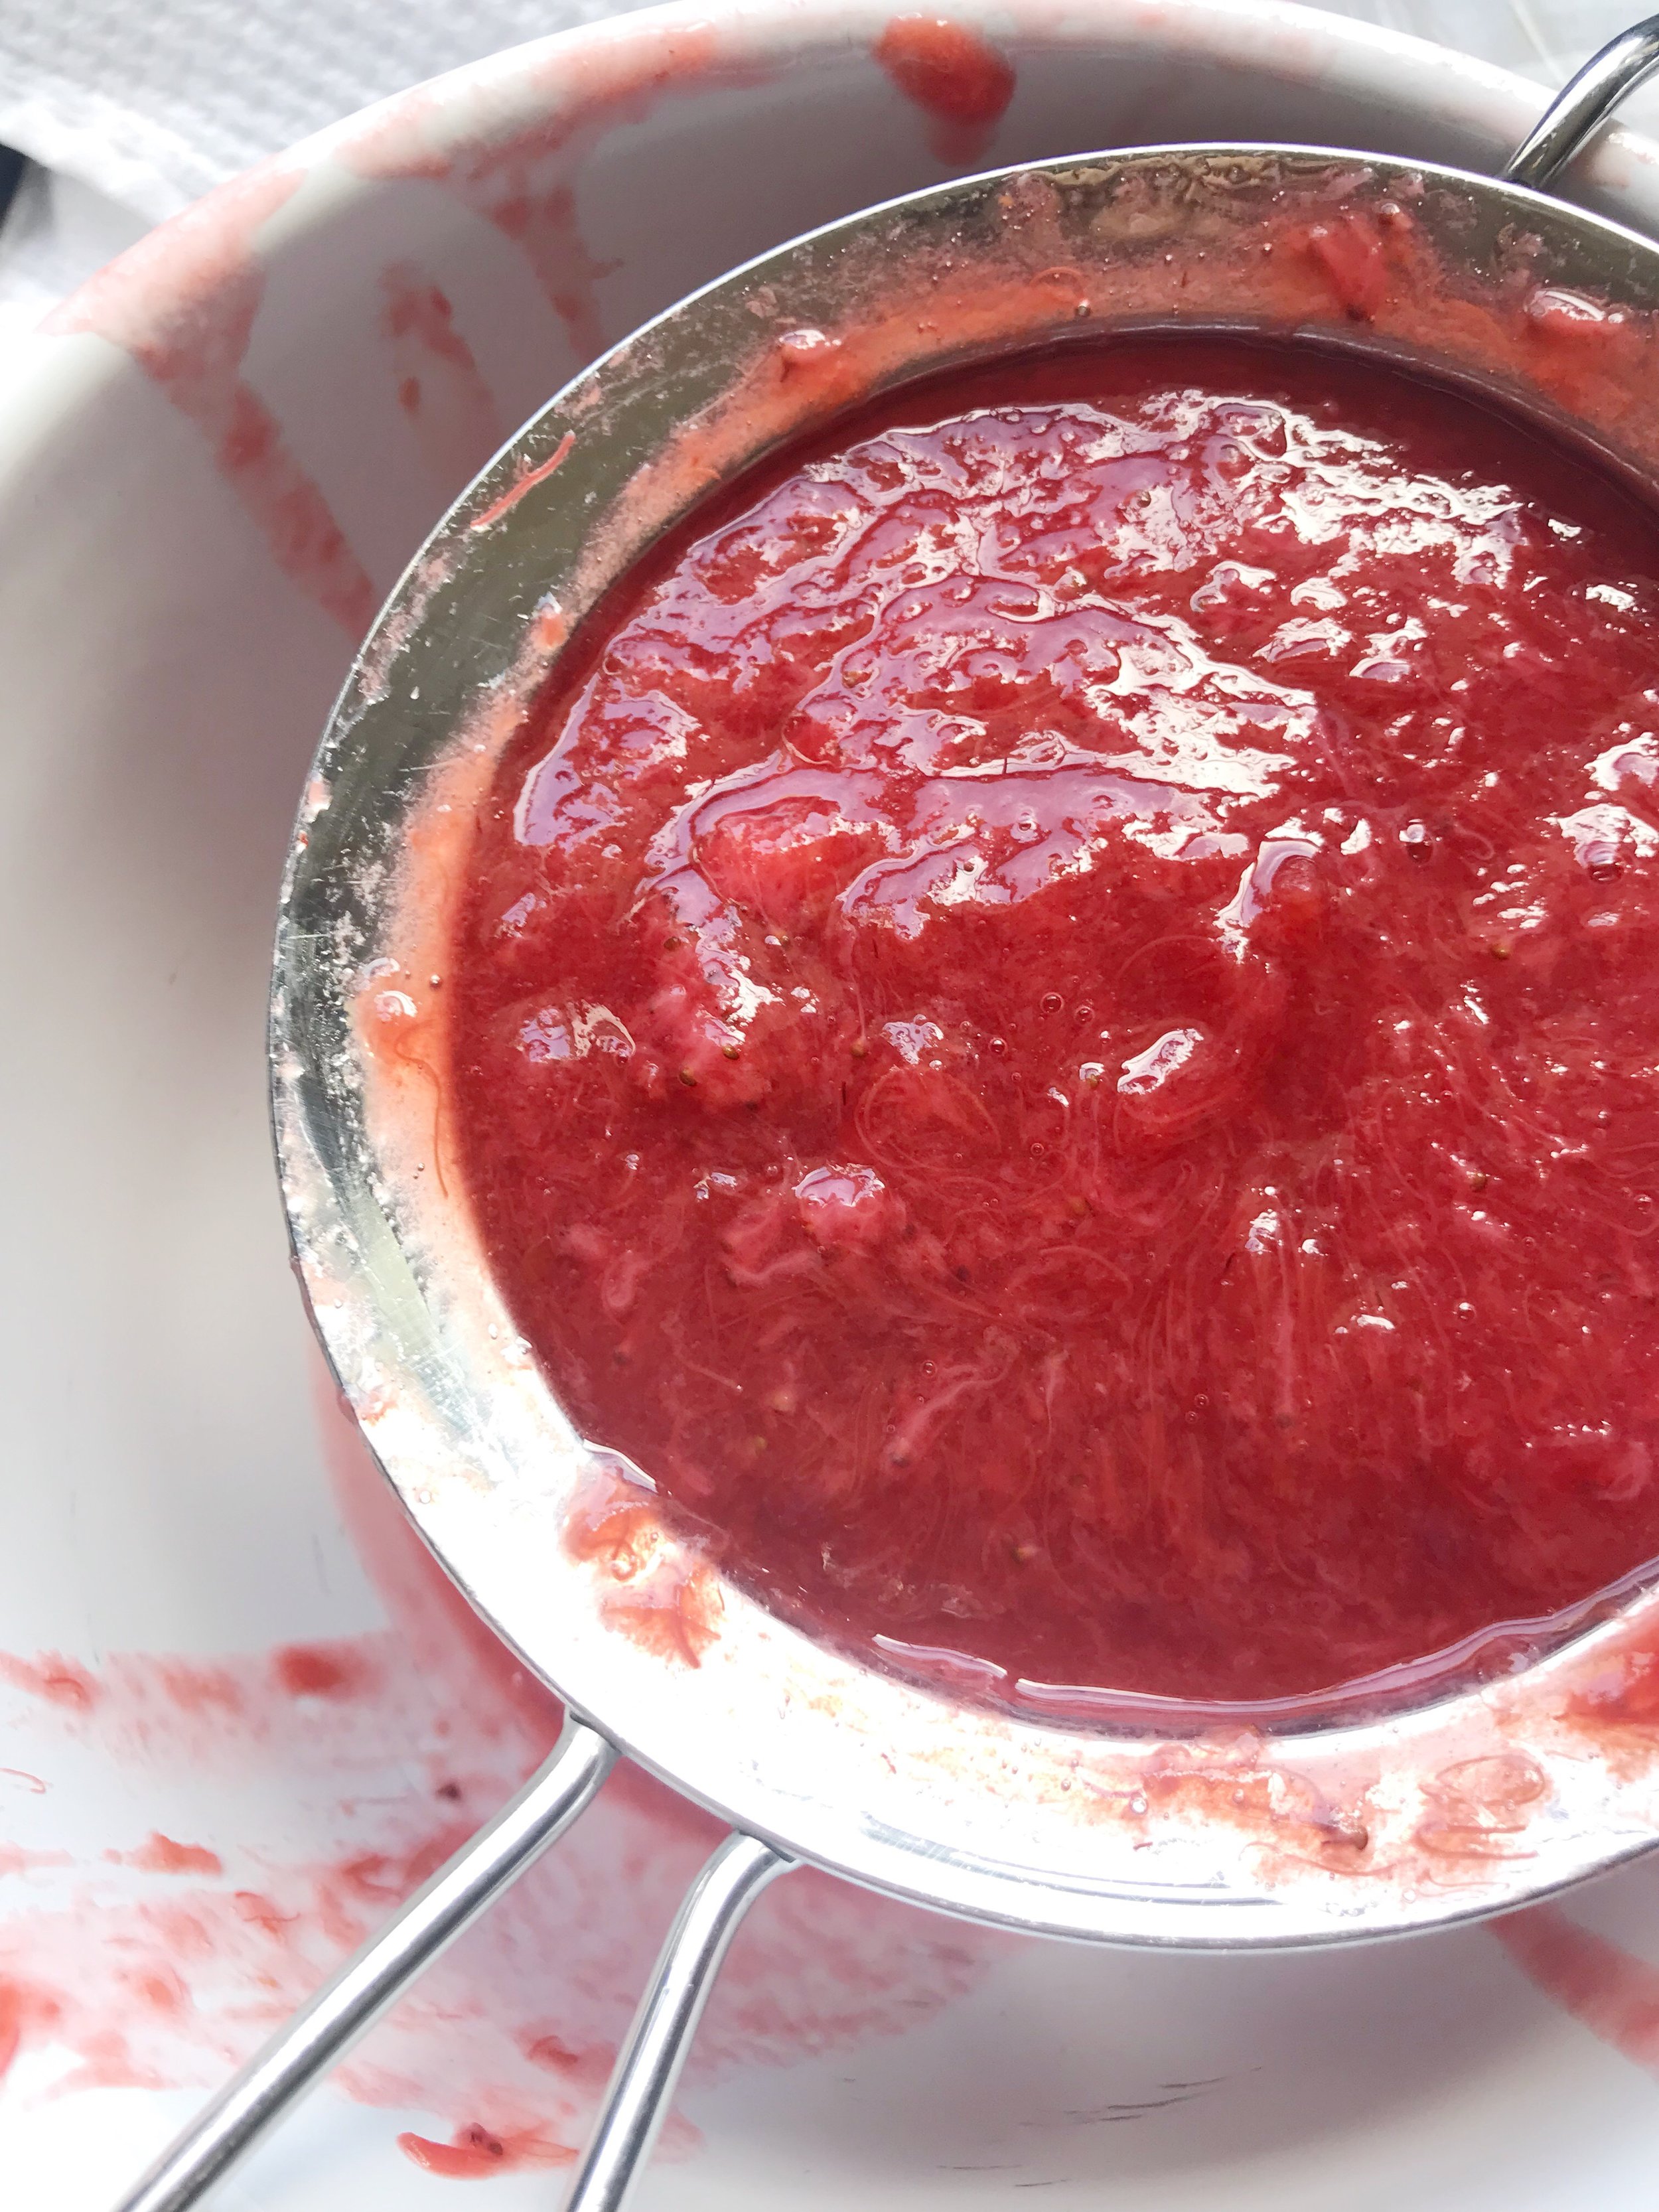
Step 2: Make the Strawberry Rhubarb Mixture. Place strawberries, rhubarb, sugar and water in a large saucepan. Turn stove to high heat. With a knife or vegetable peeler, shave several strips of peel from the lemon and add them to the pot. Bring the mixture to a boil, turn down the heat to low and simmer for 20 minutes until the rhubarb and strawberries are soft. Remove from heat, add the juice of the entire lemon to the mixture. Let cool to let the flavors combine.

Once cool, pour the sauce through a fine-mesh strainer and press the mixture with the back of a spoon to remove the liquid from the mixture. The straining should result in 2-3 cups liquid. Measure out a 1/2 cup liquid and 1/2 cup pulp in separate bowls. Place in the refrigerator and cool completely.

rhubarb_pretzel_pie_4.JPG

(Save the remaining pulp and liquid for later. It’s great on pancakes, mixed with soda water for a mocktail or spooned over yogurt for a sweet snack.)

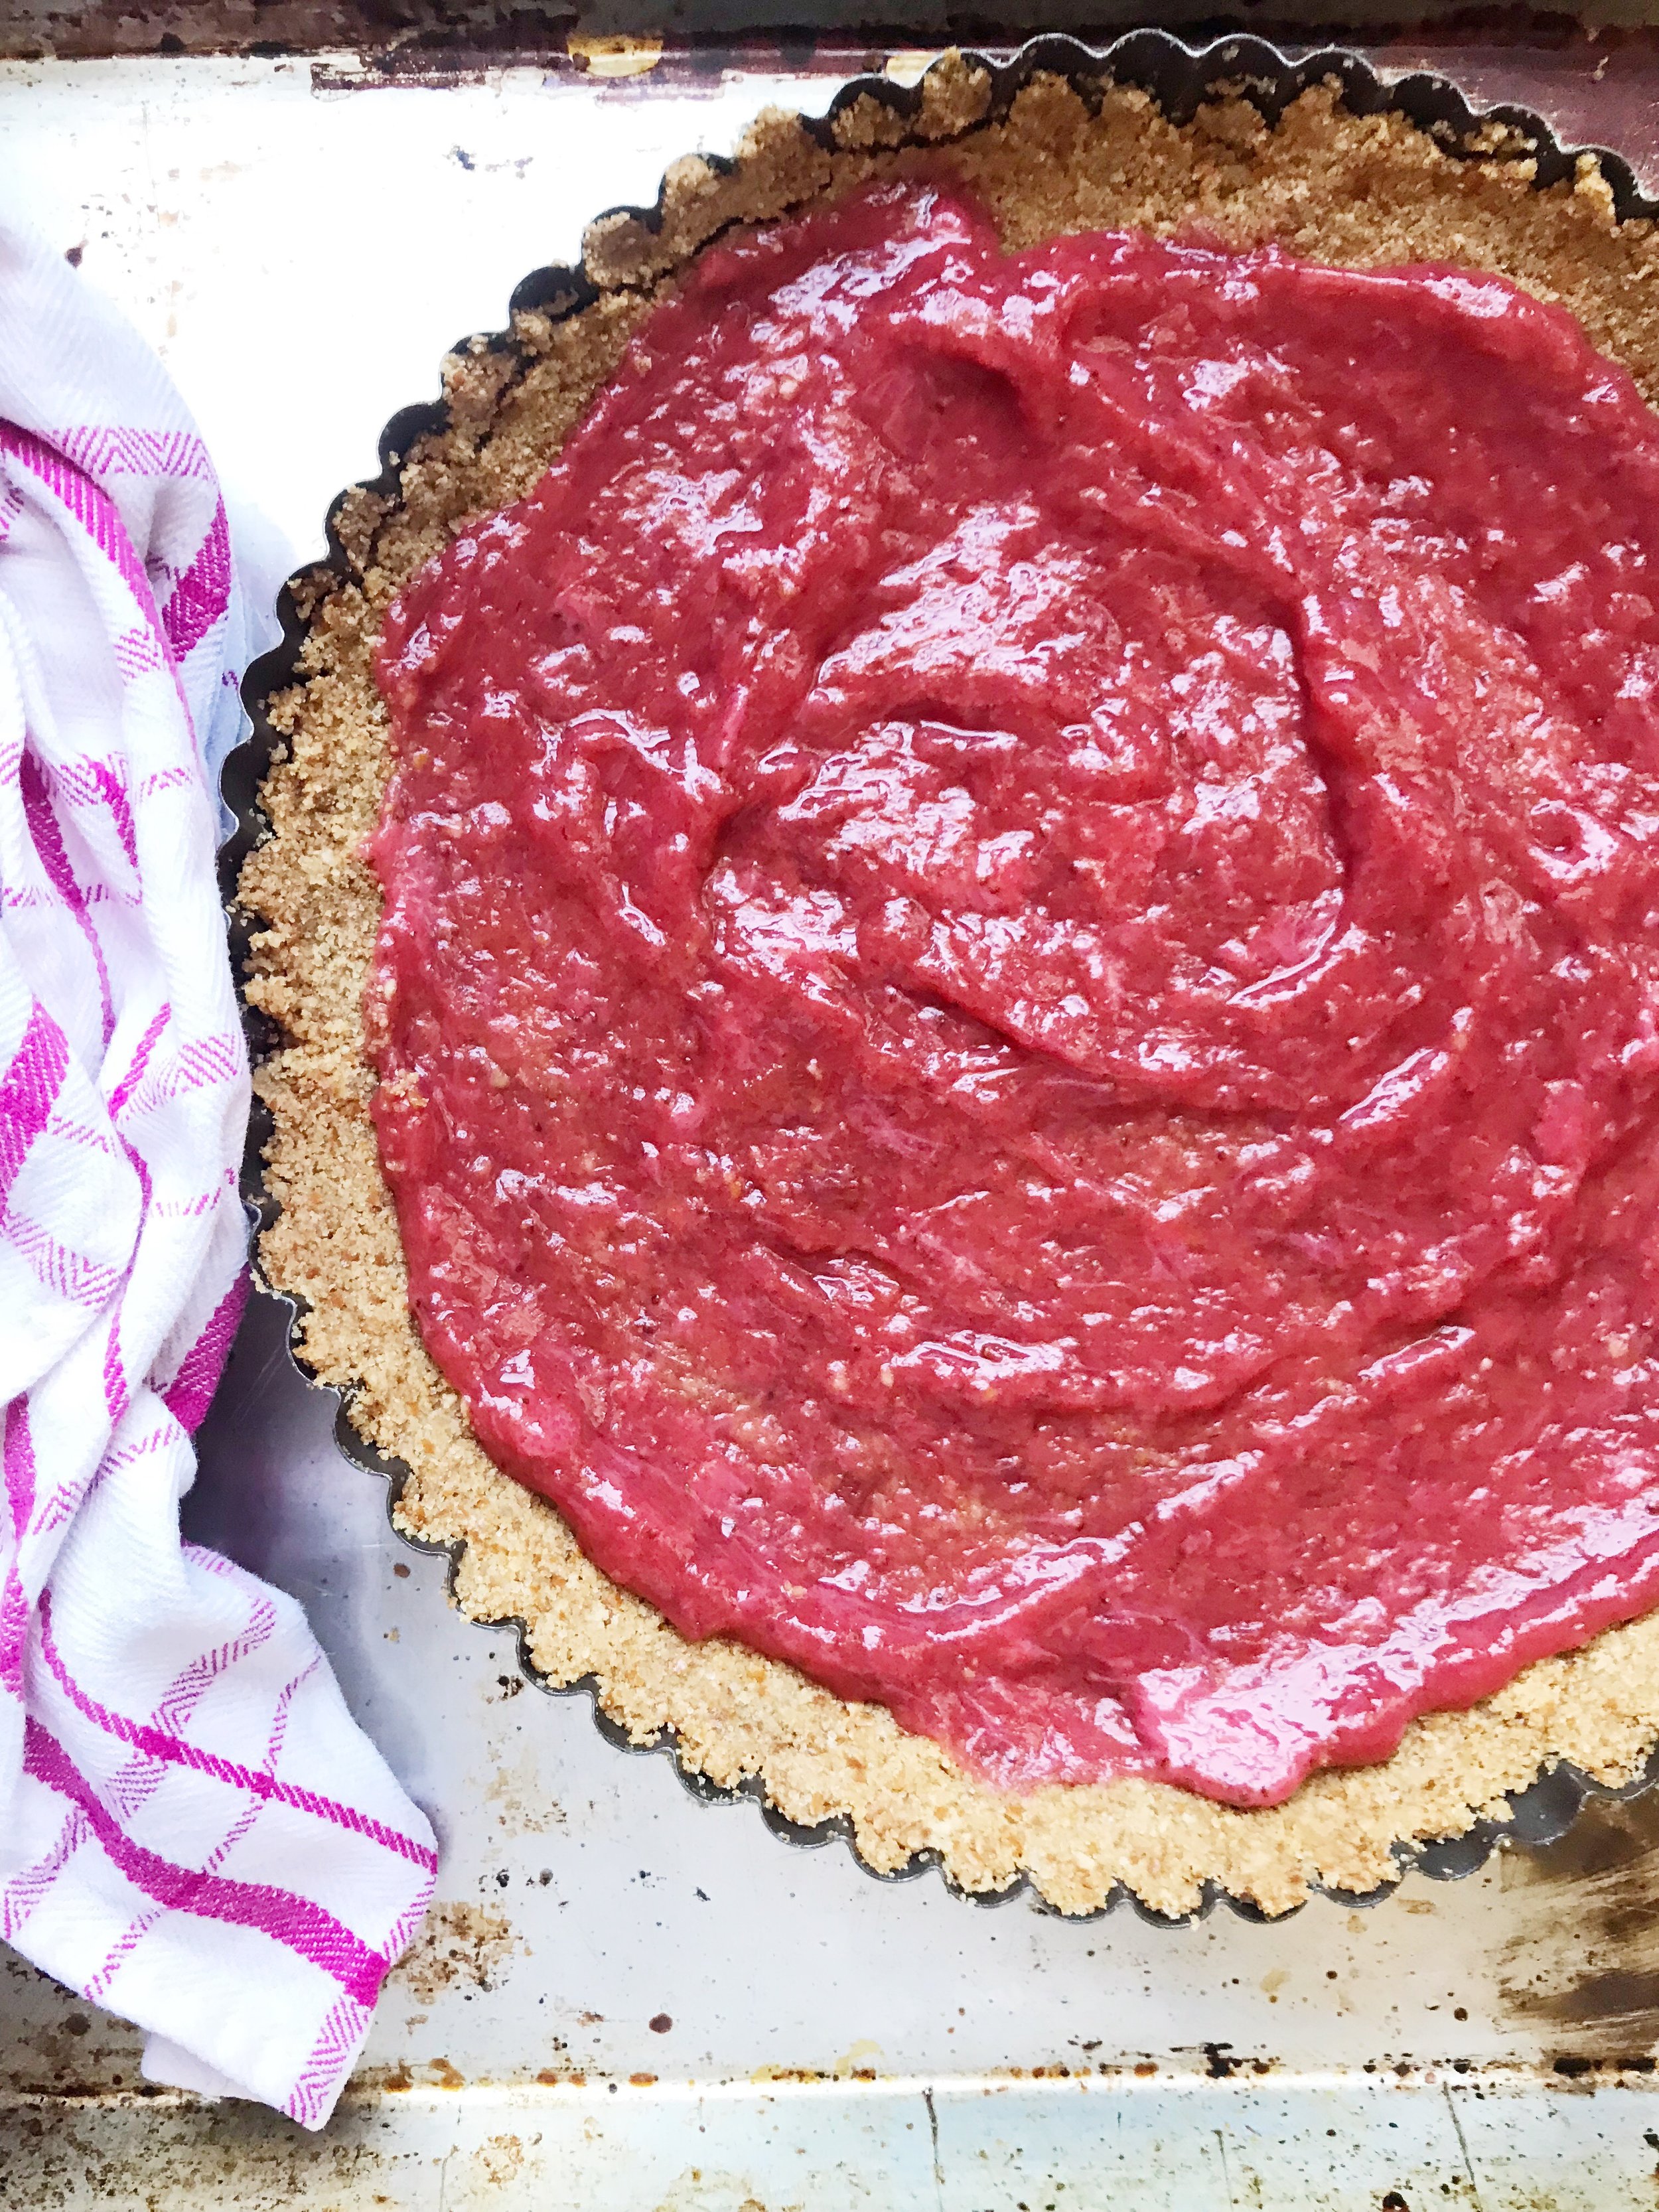
Step 3: Make the Crust. In bowl, add the pretzels, butter and sugar. Stir until combined. Evenly press the pretzel mixture into the bottom of the pie pan. Place the pie pan on a cookie sheet and bake for 8-10 minutes. Remove and let the crust cool completely. Baking will help the crust remain whole.

Step 4: Spoon the cooled 1/2 cup pulp into the bottom of the pie crust and smooth evenly. Set aside.

rhubarb_pretzel_pie.JPG

Step 5: In a medium bowl add the sweet and condensed milk and the 1/2 cup syrup. With a hand mixer, combine until smooth. Fold in the whipped topping. Poor into the pie crust.

rhubarb_pretzel_pie_3.JPG
rhubarb_pretzel_pie_5.JPG

Step 5: Cover and refrigerate about 1 hour or until set. Garnish with additional berries, pretzels and whipped topping. Store in refrigerator.

rhubarb_pretzel_pie_1.JPG

This is will be the darling of any summer barbecue. It’s the perfect warm weather pie!

Enjoy every last bite and see to soon summer friends! //

This Is Guaranteed To Easily Make Mom Happy.
mom_flower_sq.jpg

// hello friends-

Mother’s Day is this Sunday, May 12th.

Yes, this Sunday.

It tiptoed up on us didn’t it?

Maybe we planning on whipping up a macaroni necklace to present to dear old mom? Scouring the internet for the perfect #momlife mug? Contemplating spending our entire life’s savings on a huge bouquet of flowers to make mom feel grand?

Here is the bad news.

Mom wants something different this year.

Yes, the macaroni necklace will warm mama’s heart but is sure to end up in the dark recesses of her dresser drawer. The #momlife mug will most likely “accidentally” slip off the counter or be left on a bench at soccer practice. As for the flowers, HELLO!, mom taught you to save your money for a rainy day.

What does mom want?

To be presented with a beautiful DIY project that is new, fresh, modern, easy on the pocket book, fun to display and is guaranteed to make Mom swoon.

Something that is petal perfect.

And lovely.

And beautiful.

Whip out the watercolors, rummage around the closet for some tissue paper and take a bit of time to create a DIY project that mom will absolutely love:

Hand Painted Giant Paper Flowers!

mom_flowers_3.JPG

Giant Paper Flowers

Step 1: Print the free flower petal template on the card stock. With the scissors cut out the petal template and the circle shape.

Step 2: Fold the tissue paper in half lengthwise. Using the watercolors, paint the tissue paper and let dry.

mom_flower_7.JPG

Step 3: Cut a long 1.5 inch by 18 inch long rectangle from the long side of the tissue paper. Roll the rectangle into a tight tube shape. Make long incisions into the tissue tube on the short side. Do not cut all the way through the tissue. Leave a 1/4 space at the bottom of the tissue to hold the tube shape together. This will be the center of the flower. Set aside.

mom_flower_13.JPG

Step 4: Use the flower petal template as a guide and fold the remaining tissue paper under the petal template as many times as the tissue paper will allow. With the scissors, cut around the template. There should now be multiple petals. Make a 1 - inch incision in the middle of the petal base.

mom_flower_15.JPG

Step 5: Heat the hot glue gun on low. Place one dot of glue on the left side of the base of a flower petal. Pinch the right side over the left. Repeat until all the petals are complete. Using the circle card stock shape as a flower base, glue the tissue paper petals onto the circle base by overlapping the edge of each petal just a bit.

Step 6: Glue the center of the flower in the middle of the petals. Take one (1) flower wire and poke a small hole in the back of the flower. Remove the wire and add a dab of glue and then reinsert the wire.

mom_flower_20.JPG
mom_flower_21.JPG
mom_flower_sq_2.jpg
mom_flower_32.jpg

So much love and fun went into making this DIY project, Mom is sure to feel overjoyed and very appreciated.

To all the wonderful Mamas, Happy Mother’s Day!

Until tomorrow creative friends! //

When Creativity Dies, Here Is How To Free Your Mind.
creative_rut_sq_2.jpg

// hello friends-

If you’ve ever felt as though you’re in a creative rut, you’re not alone. Sometimes we all feel stuck.

Stuck in our lives.

Stuck in our work.

Sometimes, just stuck in being stuck!

Well, the good news is we are all human and our human brains sometimes need a giant creative force to spark new ideas from the deep, dark corners of our old grey matter. Sometimes we need an outside jolt, like a great white hot bolt of lighting, to nudge us through the dullness and push us out of our creative apathy.

creative_rut_sq.jpg

This is the time we need to seek out inspiration from creative minds and look to places like Invaluable where inspiration abounds. Invaluable developed this interesting infographic that details how to harness creativity. Salvador Dali, the prominent Spanish surrealist painter, was rife with innovative thoughts and new approaches to his work. Although he was quirky, eccentric and at times seemed downright mad, he developed “6 Ways To Harness Creativity: The Dalí Way” which provides excellent ideas on how to get unstuck and gather inspiration.

My personal favorite is, the “Hypnagogic Nap” which taps into the subconscious brain for imagery. It’s pure genius!

creative_rut_sq_6.jpg

Well, I am off to take a short nap, get unstuck, and get back on a creative path. If you need a bigger creative push, try my Skillshare class, “Create Everyday: How To Unlock Your Creative Magic Now.”

Enjoy the Dalí wisdom and getting back on the creative train.

Until soon creative friends!

MayAndra Weberyet, today
Here Is the Easiest Recipe To Celebrate Spring.
rhubarb_sauce_sq.jpg

// hello friends-

The start of spring is here and the good stuff has started to bloom. Flowers are popping, sunshine is bursting, birds are singing and bees are humming their way right into the most creative time of the year. For a short few weeks spring also provides us with the perfect spring vegetable:

Rhubarb!

In my book, this darling stalk of red, glossy goodness makes spring the most delightful time of year. You can read all about this unappreciated vegetable here on: EarthEasy “Rhubarb: The Unsung Hero Of The Spring Garden.”

After researching rhubarb, we might find our stomachs rumbling for an easy rhubarb recipe. Slather this rhubarb spread on bread, layer it in a delicious dessert or just eat it spoonful by spoonful to celebrate this perfect time of year!

rhubarb_sauce_.jpg

Rhubarb Sauce

Ingredients:

  • 10 cups chopped rhubarb STALKS ONLY! (remove all green leaves from the stalks as the leaves are poisonous)

  • 3/4 - 1 cup unfiltered honey (add more or less honey depending sweet to tart ratio)

Step 1: In a large sauce pan, add the rhubarb and honey and turn the burner to medium-high heat. Let the mixture come to a boil and stir.

Step 2: Set and start a timer for 20 minutes. Let the mixture cook and stir frequently. When 5 minutes is left on the timer, carefully taste the mixture as the mixture will be hot. Add more honey if the mixture is too sour for liking. Continue to cook until the mixture is the consistency of pudding, about 5-10 minutes more.

Step 3: Let the rhubarb sauce cool. Place the sauce in an airtight container in the refrigerator for up to 1 week.

Slather, layer it, drop it on top of just about anything!

rhubarb_sauce_7.JPG
rhubarb_sauce_3.jpg

What an easy and delicious way to celebrate spring!

Until soon friends. //

Here Is How To Freshen Up Your Office For Spring.

This post contains affiliate links.

string_art_sq_2.jpg

// hello friends -

Spring has sprung! Our landscapes are coming alive with flowers blooming, little critters hatching and sunny days filled with glorious warm moments. Many of us may feel the impulse to do some spring cleaning or freshen up our home with a fresh coat of bright paint, a big flower bouquet or find just the right spot for a new plant. When I came across this DIY air plant string art project by ProFlowers, I couldn’t pass up the opportunity to create a modern decor piece for my office!

Air plant string art combines creative string art designs with air plant accents to create unique living art for your space. There are so many different styles that you can create with this concept, from bohemian to minimalist and everything in between. Check out these amazing design ideas from ProFlowers.

Image by ProFlowers

Image by ProFlowers

Image by ProFlowers

Image by ProFlowers

Image by ProFlowers

Image by ProFlowers

When I went to create my project, I kept it neutral. However, go ahead and feel inspired to paint the wood base with a bright coral or aqua for a fun pop of color on your wall. If you plan on painting your base, just give the surface time to dry before you start hammering the nails into the wood.

Let’s get started on this “DIY Air Plant String Art” by ProFlowers.

string_art_supplies.jpg
string_art.jpg

To create your own personal air plant string art follow the instructions laid out below or check out the comprehensive “DIY Air Plant String Art Tutorial” at ProFlowers.

Step 1: In pencil, mark where your nails will go with light markings on your wood.

Step 2: Hammer in the nails on a protected/covered work surface. Make sure to leave at least half an inch exposed above the wood so you’ll have room to tie and cut your string.

Step 3: Tie your string onto the nail at your starting point and make sure it’s tied tight.

Step 4: Wrap your string around different nails, loop them twice for a better hold.

Step 5: Tie the string and cut off any loose ends, make sure the string is pulled tight so the air plants will stay put on in the string.

Step 6: Place the air plants in your string design and make sure they’re secure.

Step 7: Enjoy! Display your art by propping it up or hanging it on a wall and just your air plants regularly to keep them fresh.

* When purchasing the wood base, consider the thickness of the wood and the length of the nails needed for your project. For example, a 1/4 inch thick base would be too thin for a 1-inch nail.

string_art_5.jpg
string_art_1.jpg


Isn’t it lovely to have a little a creative spring refresh in our office? If you want to keep creating check out my “Create Everyday: How To Unlock Your Creative Magic Now!” class on Skillshare. It’s a great way to keep creating everyday.

string_art_happy.jpg

Until, soon friends!

Create Everyday: Unlock Your Creative Magic Now!

This post contains affiliate links.

// hello, friends -

I have been thinking a lot about us lately.

How many of us tell ourselves this story?:

"I am not creative."

How many of us are feeling deeply frustrated in our work because we have hit a roadblock and said?:

“I don’t know what to do next.”

Who has a secret, meaningful project tucked inside a desk drawer waiting to be born but has said?:

“I’m not good enough.”

Well, I have some secret sauce, fairy dust, and a magic wand that will help YOU unlock YOUR creative magic!

It’s a creative Skillshare class {affiliate link} developed just for YOU and it’s called “Create Everyday: How To Unlock Your Creative Magic Now.” {affiliate link} Stuffed with quirky, short, 3-min daily projects that will:

* Give specific tips and tools to unlock your creative potential no matter your background or profession.

* Get your creative juices flowing by providing short, realistic exercises to help you develop a creative habit.

* Provide a new way of thinking that will potentially ignite meaningful, creative "Ah Ha!" moments that will offer different ways of thinking about a project, business or life!

Did I mention it’s SUPER DUPER fun?

So, Iet’s dust off our mystical crystal ball and ask it a BIG important question…

And sign up to do some learning on Skillshare, and Create Everyday To Unlock Our Creative Magic Now! {affiliate link}

Just click the button below to sign up for Skillshare classes. The first 2 months are FREE for new members.

Drop me an e-mail and let me know how the learning is going.

Until tomorrow magical creative scholars! //

Make Your Valentine's Day Sweet Friends!
valentines_day_illustration.gif

// Hello, Friends-

Happy Valentines Day!

Don’t forget to indulge today and create the sweetest day ever for yourself and everyone you love! Buy or make yourself or someone you adore something extra special, like chocolate covered strawberries or a DIY card. Whatever we do today, let’s tell the people we love they are special and they are loved.

valentines_day_illustration_words.jpg

Let’s celebrate all the people who bring love, light and happiness to our lives. After all, it’s a great day to find sweetness in the moment.

valentines_day_illustration.jpg

Until soon sweet friends. //

Here Is How To Warm Your Heart This Valentine's Day.

This post contains an affiliate link.

lavender_valentines_sq.jpg

// Hello, Friends!

February is a chilly month that leaves us feeling frozen to the bones. With the cold winds of the north blowing and the endless dampness that endures even on sunny days, we can find ourselves hiding out in our homes and tucking ourselves away from each other. This time of year can make us start to feel isolated, alone and downright sad!

We need a warm, sweet reminder that someone, somewhere loves us.

lavender_heart_valentines_12.jpg

How about a project that is adorably soft and gently stuffed with sweet lavender?

After all, lavender has a way of healing even the darkest of times. More can be read about lavender here at “All About Lavender.”

That’s why my little helper and I were back at the sewing machine and created a tender project that can warm any frozen heart!

lavender_heart_valentines_8.jpg

Heart-In-A-Pocket Valentines

Step 1: Download, print and cutout the heart/pocket template and pocket cards. Mix the rice and the lavender in a bowl.

Step 2: Pin the heart and pocket template to the fabric. From each color fabric, use the scissors to cut out 2 hearts and one pocket.

lavender_heart_valentines_9.jpg

Step 3: With the the sewing machine, sew each pocket to the front side of each hear. ( 5 colors of fabric = 5 pockets on 5 hearts)

lavender_heart_valentines_15.jpg

Step 4: Sew the front and the back of the hearts together but leave a 1-inch opening on one side of the hearts.

Step 5: Pour approximately 1 tablespoon rice/lavender mixture into each heart and then sew the opening closed with the sewing machine.

lavender_heart_valentines_14.jpg

Step 6: Write a little message on the small pocket card or use the pre-made designs on the template, fold in half and stuff the card into the pocket of the heart.

lavender_heart_valentines_1.jpg
lavender_valentines_sq_4.jpg

Stuff these little darlings into a backpack, workbag, purse or in a pocket. They are bound to warm your Valentine inside and out.

Until tomorrow sweet Valentine friends!

Andra Webertoday, yet
You Are Going To Love This Healthy And Sweet Start To The Day!
celery_muffins_sq_5.jpg

Hello, Friends-

January is coming to a close and perhaps our New Year’s Resolutions are too. It’s hard to stick to our personal promises for an entire month, let alone an entire year. Once the month of January gets cooking, our resolutions can start to feel like cheap lies we negotiated to keep our December holiday high partying forward. Somewhere during the last week of 2018, between the second and third plate of holiday cookies and the forty eight hour Netflix binge watching marathon, we made pledges and oaths to ourselves that now seem downright absurd.

Like the very dark resolution I jotted down at the last day of 2018:

“Eat 5 more vegetables a day in 2019.”

The next day, I promptly stuffed my face full of chili lime corn chips. While I reassured myself that corn was indeed a vegetable, with personal reflection and some truth, I realized the goal of my resolution was simply to be more healthy. As desperate people do, I Googled the biggest health fad of 2019 and jumped enthusiastically on the “get me healthy no matter what the cost I don’t care what it tastes like” banwagon.

For the record, the health fad of 2019 is Juicing Celery.

Yes, Juicing Celery.

celery.jpg

Yes, the same good old green vegetable that is the forgotten child of any crudité platter is now the health darling of 2019. More can learned about the benefits of juicing celery here at The Chalkboard , “6 Surprising Health Benefits Of Juicing Celery.”

Yes, I did try juicing celery in my blender. Yes, the juice did taste something like lawn clippings, dirty rope and molted apple skin. It wasn’t bad. However, in my opinion the real goodness sits in the bottom of the juicer or the goop left after straining the liquid out of the blender; celery pulp.

What do we do with this blob of green celery stuff?

Throw it into a batch of whole wheat muffins and hope the muffins taste better than the celery juice. The verdict is these Celery & Fruit muffins were one of the moist, delicious and satisfying muffins ever tasted.

Don’t take my word for it, hop on the celery train and whip these simple healthy delights.


Celery & Fruit Muffins

Adapted from King Arthur Flour “100% Whole Wheat Blueberry Muffins” Recipe.

Ingredients

  • 2 1/2 cups Premium Whole Wheat Flour

  • 1 cup light brown sugar

  • 3/4 teaspoon salt

  • 1 teaspoon baking powder

  • 1/2 teaspoon baking soda

  • 1/2 teaspoon ground cinnamon

  • 1 teaspoon vanilla extract

  • 1/3 cup vegetable oil

  • 1 cups buttermilk

  • 3/4 cup celery pulp (what’s left after juicing fresh celery)

  • 1 cup frozen raspberries

  • 1 /4 cup Turbinado sugar

Step 1: Preheat the oven to 400°F. Grease the cups of a large muffin pan (6 muffins). (If using a 12 cup muffin pan see cooking time in Step 5.)

Step 2: In a large bowl, whisk together the flour, brown sugar, salt, baking powder, baking soda and cinnamon.

celery_muffins.jpg

Step 3: Add the vegetable oil, buttermilk, celery pulp and mix to combine.

Step 4: Fold in the raspberries into the batter and drop an even amount of batter into each muffin cup. Sprinkle each muffin cup with about a teaspoon of Turbinado sugar.

Step 5: Bake the muffins for 24-28 minutes, until a toothpick inserted into the middle of one of the center muffins comes out clean. (If using a 12 cup muffin pan bake the muffins for 18 - 22 minutes or until a toothpick comes out clean from the center of a muffin.)

Step 6: Remove the muffins from the oven, and let cool for 5 - 10 minutes and enjoy warm. Leftovers can wrapped and stored in the refrigerator for up to 3 days.


celery_muffins_10_1500.jpg
celery_muffins_sq_3.jpg
celery_muffins_sq_2.jpg

Enjoy the muffins and staring our day, our year in a sweet and healthy way!

Cheers to developing creative ways to keep our promises.

Until soon Friends!

Andra Webertoday, yet, popular posts
10 Minutes Is All You Need To Make Your Winter Super Warm.

This post contains an affiliate link.

winter_scarf.gif

Hello, Friends-

It’s that time of year again. The excitement of the holidays are over. It’s cold outside and we are starting to feel the depths and realities of winter hibernation. We distract ourselves by organizing. Our family puts up with our attempts at a Marie Kondo {affiliate link} organized house only to locate our happy, skimpy swimsuit tucked deep behind our thick wool sweaters and flannel shirts. We are reminded that life isn’t always grey and icy. We cry a little and morn the sunny, ice cream filled, warm days of summer.

January is worst month ever.

But it can be better with something warm and snuggly.

Adopt a little puppy?

Sure, but I have something easier. A new winter scarf.

This project only takes a few minutes and is bound to keep winter blues away.

diy_winter_scarf_8.JPG

DIY Winter Scarf

Step 1: Layout the fabric on the flat surface. Cut off the binding edges.

diy_winter_scarf_6.JPG

Step 2: Measure 4-inch from the short edge with a ruler or t-square. Use the masking tape and make a 4-inch guide down the side of the short side of the fabric.

diy_winter_scarf_3.JPG
diy_winter_scarf.JPG

Step 3: Line up the ruler or t-square with the tape. Cut 1-inch fringe down the length of the fabric.

diy_winter_scarf_1.JPG

Step 4: Tie each fringe piece in a not too tight knot.

Enjoy the cozy scarf all weekend long and beyond.

diy_winter_scarf_5.JPG

Stay warm friends. Until soon!

Andra Webertoday, yet
Here Is How To Make Your New Year's Resolutions Front And Center.

This post contains affiliate links.

magnetic_new_years_sq_5.jpg

Hello, Friends-

Who made New Year’s Resolutions that died the first week of January?

Yep, I’m raising my hand too.

This year, my big commitment is to change my life perspective from “a glass half-empty” to “a glass half-full” mindset by asking myself all day long “What’s Not Wrong?”

magnetic_new_years_sq.gif

This is a simple resolution to check in with myself and the universe to find the good that is happening everyday.

And I am failing miserably.

So, how do we make the easiest of New Year’s Resolutions stick? Let’s bring our thoughts front and center with a simple and easy project that will make those promises to ourselves truly magnetic.

Magnetic Resolutions.

Step 1: Draw circles on the paper by tracing around one lid with a pen or pencil. Cut out the circle with the scissors. (Optional: Skip tracing and cutting and just use the paper punch cut out scalloped circles.)

Step 2: Write the resolutions on the paper circles and glue them to the inside of the lid. Place a magnet or two on the back of the lid.

magnetic_new_years_1.JPG

Now, let’s stick our messages on our refrigerator. As we grab grab the eggs for breakfast or sneak some ice cream before dinner, we won’t be able to dodge those promises as we make them front and center!

magnetic_new_years_2.JPG

Until soon magnetic friends!

Andra Webertoday, yet
Happy New Year! Let's Make This Year 3 Million Dollar Good.
blue_fin_tuna_sq.jpg

Friends, Happy New Year!

It’s been few weeks since we have talked creative projects. The holidays gifted me with a few weeks of downtime as I was knocked out with a nasty virus and the bug was so grim even the Grinch would have had some heart. Now that 2019 is just getting started, I am back on my feet, feeling great, and ready to send you gobs of creative projects to make this a Bluefin Tuna year.

Yes, Bluefin Tuna.

blue_fin_tuna_sq_2.jpg

As I was struggling to get better, I scrolled through news outlets and stumbled upon this article in the New York Times: “Japan’s ‘King of Tuna’ Pays Record $3 Million for Bluefin at New Tokyo Fish Market.” Yesterday, I had a conversation with a friend about making big life decisions in 2019. We were chatting about if micro goals are better than macro goals.

Me: “Do we want to be catfish?”

Friend: “Catfish?”

Me: “Or do we want to be Bluefin Tuna?”

blue_fin_tuna_sq_3.jpg

There is nothing wrong with being a catfish. However, it isn’t rare in it’s talents, command attention, or bring a price of 3 million dollars at auction.

this_is_your_year.gif

So, let’s make this our year and 3 million dollars good.

Until tomorrow friends!

Andra Weberyet, today, quotes
This Is The One Cookie Recipe That Will Bring You Joy.

This post contains affiliate links.

ginger_giant_cookies_sq.jpg

The holidays can be SO Jolly!

Until they’re NOT.

Like when we have a whole pipeline of fabulous holiday ideas ready to create only to have a nasty little virus take down one cute kiddo. After five days of wiping noses, doctor’s visits and the logistics of getting one kid to school while one is flat out in bed, I am finally back at my desk, trying to be jolly and ready to sooth my stress with some emotional holiday eating!

What’s a better way to pacify our festive fretting than this recipe for “Ginger Giants?” They are big, chewy, spicy, sweet and warm us like this two person Christmas sweater {affiliate link}. They might just be a slightly better brick of love than “Peppermint Molasses Superstars but either recipe is a delicious winter delight!

ginger_giants.jpg

Ginger Giants

Serving: About 12 large cookies

  • 3/4 packed cup dark brown sugar

  • 1 cup softened unsalted butter

  • 1 large egg

  • 3/4 cup unsulphured molasses

  • 2 3/4 cup all-purpose flour

  • 1 teaspoon baking soda

  • 1/2 teaspoon salt

  • 2 teaspoons baking powder

  • 1/2 teaspoon ground cloves

  • 1 teaspoon ground cinnamon

  • 1 1/2 teaspoon ground ginger

  • 3/4 cup candied ginger

Vanilla Frosting

  • 8 tablespoons butter softened

  • 4 cups powdered sugar

  • 4-5 tablespoons heavy whipping cream

  • 1/2 tablespoon vanilla extract

  • a pinch of salt

  • Sweet Tooth Fairy Sprinkles {affiliate link} or more candied ginger for decorating (optional)

ginger_giants_7.jpg

Step 1: Preheat oven to 325°F and line cookie sheets with parchment paper. In a large bowl, cream together brown sugar and butter until creamy. Beat in the egg and molasses until light and creamy.

Step 2: Whisk together dry ingredients in a medium bowl then add them slowly to butter mixture.

Step 3: Use an ice cream scoop to drop the cookie dough onto prepared sheets 2 inches apart and bake for 10-12 minutes and then switch positions of the baking sheets in the oven. Bake for another 10-12 minute or until set. Cookies should be firm and dull in texture in the middle when done.

Step 4: Cool on baking sheet for 3 minutes, then transfer to a wire rack to cool completely.

Step 5: Prepare the frosting. With a mixer, whip the softened butter on high for 3 minutes. Turn off the mixer and add the powdered sugar. Combine until smooth. Add the cream, vanilla and salt. Whip until smooth.

Step 6: With a butter knife or an offset spatula, frost the cookies with one tablespoon frosting. Add sprinkles or a couple more pieces of candied ginger. Store in an airtight container in the refrigerator for up to 5 days.


ginger_giants_4.jpg
ginger_giants.jpg

Enjoy the warm goodness and happy cookie making friends!

How To Make Your Neighbors Jealous This Holiday.

This post contains affiliate links.

diy_holiday_wreath_12_12_18_sq_6.jpg

Season’s Greetings, Friends,

What is it about the smell of evergreen that signals delightful and joyous holiday moments? There is something about bringing nature into our homes that feels celebratory and a wreath at our front door reveals our home is ready to soak in the happiness of now.

However, finding a wreath that does a job of shouting a warm holiday hello is hard to find.

Unless we create our own.

And it’s simple with just a few items. I call these my little minimal darlings as they are very easy to make with very few supplies.

diy_holiay_wreath_19.jpg

The Minimalist Wreath

Step 1: Place the macrame ring on a flat surface and plan out the floral design with the winter greens. Cut the greens as necessary to fit the design.

diy_hoiday_wreath_15.jpg

Step 2: Pick the greens that will go at the very back of the design and wind the floral wire around a bunch of greens. Place the bundle on the macrame ring and twist the wire around the ring securing the greens to the ring. Snip the wire when the bundle is secure.

diy_holiday_wreath_16.jpg

Step 3: Bundle up the next group of greens and repeat until your wreath is complete.

diy_hoiday_wreath_18.jpg

Step 4: Tie a ribbon to the macrame ring and hang from the front door or wherever a little holiday spirit is needed.

diy_holiday_wreath_13.jpg
diy_hoiday_wreath_12.jpg
diy_holiday_wreath_5.jpg
diy_hoilday_wreath_11.jpg
diy_holiday_wreath_14.jpg

Stand back and watch as your neighbors envy the beautiful, holiday hello adorning your front door or entryway.

Until tomorrow festive friends.

You Need To Make These Easy Pom Poms.
easy_pom_pom_12_10_18_sq_3.jpg

Hey, Friends-

As the holidays roll through our lives, the holiday stress to get things done can overwhelm even the most organized reveler. That’s why I want to share with you a 5-minute project to take our minds off all the chaos, DIY Pom Poms.

These little fluffy delights are just like the sprinkles on a perfectly iced sugar cookie; easy to make and even easier to enjoy!

DIY Pom Poms

  • yarn

  • a kitchen fork

  • embroidery string (optional)

  • scissors

easy_pom_poms.JPG

Step 1: Take the end of the yarn and pull it through the fork tines.

easy_pom_poms_7.JPG

Step 2: Wrap the yarn around all the fork tines 60 times.


easy_pom_poms_1.JPG

Step 3: With the embroidery string, tie a knot around the yarn. Slide the yarn off the fork and cut the yarn loops on the right and left sides.

easy_pom_poms_2.JPG

Step 4: Give your new pom pom a haircut and it’s done!

easy_pom_poms_3.JPG
easy_pom_poms_5.JPG

Use the pom pom to add a little burst of fluffy delight to any package, mark the pages in a good book or stand back and let the easy fun of making a pom pom release the stress of the holidays!

Until tomorrow friends.


Andra Webertoday, yet
This Is What You Need To Wear To Any Holiday Party.

This post contains affiliate links.

diy_holiday_sweater_sq.jpg

Hi, Friends,

It’s the holidays.

There is stress eating to do, ridiculous white elephant gifts to buy, the overtly showboating holiday letter to write, and so much more on our never-ending holiday lists! Who has energy or time to drum up something festive to wear?

Maybe we are leaning toward wearing something simple and demure like this is holiday sweater: Cat-A-Palooza Holiday Sweater {affiliate link}

Or maybe the universe has been good to us and we would rather spend our holiday bonus at Goop on this “Skirt With Ducks?” It’s on sale for $375 down from $1,043! What a steal! Maybe you can get away with calling it “Seven Swans A Swimming Skirt?”

If both of the above options sound worse than fruitcake after a night of drinking tequila, I have a very simple, festive and downright darling solution. It won’t make you go blind with kitten power and it won’t break the bank.

A Pom Pom Sweater.

It will cost us about $30 and we can get all the supplies at Target and online.

A New Day Eyelash Sweater (Target! I went up a size to leave room to stuff my belly with Big Peppermint Cookies. Yes, I do think about these things.)

1 pack Tinsel Pom Poms {affiliate link}

1 pack safety pins {affiliate link}

Step 1: Place the sweater on a flat surface and randomly pin the pom poms to the sweater from the back side. Alternate colors and sizes.

diy_holiday_sweater.jpg

Or wear the sweater, look in the mirror, and pin the pom poms on the back side.

Step 2: Celebrate your festive look!

diy_holiday_sweater_2.jpg
diy_holiday_sweater_andra.JPG

Happy Holidays Simple And Chic Friends!

When You See This Awesome Monster, Joy Will Follow.

This post contains affiliate links.

yeti_pencil_topper_sq.jpg

Images of winter monsters are usually reserved for blizzard filled nights when bedtime anxiety makes its sneaky debut. However, what if there is a monster that could fill anyone’s winter, day or night, with twirly, whirly, glittery mounds of joy?

Well, I have the coolest project for you.

Trust me.

It’s a super-duper frosty good one.

Yeti Pencil Toppers!

Every grown-up and kid who sees these scruffy, wacky wonders, can’t resist giving them a good old shake. They are 100% adorable, easy to make and delightful to give. They do get lonely so make sure to make a whole bunch. Top them on presents or tie them on a sweet little tag to give as a gift. Anyway you present it, every little beast in your life will enjoy making them or be delighted to get them for some winter fun.

Note: The directions below are for one (1) Yeti pencil topper. However, it’s easiest to buy supplies in bunches and yards. You will have supplies for lots of pencil toppers.

yeti_pencil_toppers_8.jpg

Yeti Pencil Toppers

Step 1: Cut the fur per the Yeti template found here. Place the faux fur, fur side down on a work surface with the top being the short 2.5” inch side. MAKE SURE THE FUR IS POINTING UP.

yeti_pencil_toppers_17.jpg

Place a line of glue on the two longer 3.5” sides. Align the top of the pencil at the top of the fur and push the pencil into the glue on the left side.

yeti_pencil_toppers_15.jpg

Step 2: Roll the fur tightly around the pencil and tie the ribbon tightly to the base of the fur.

yeti_pencil_toppers_13.jpg

Step 3: Use the FREE Yeti template found here to cut out an oval face and horns from the felt. Glue each piece to the fur. Glue the googly eyes to the blue felt.

yeti_pencil_toppers_7.jpg

Step 4: Let dry overnight, add a tag and give it to all the sweet little monsters in your life.

yeti_pencil_toppers_6.jpg
yeti_pencil_toppers_3.jpg

Until tomorrow winter friends!

Andra Webertoday, yet
Make This The Most Creative Holiday Ever!
snowflake_wrapping_sq_3.jpg

Hey, Friends,

It's Giving Tuesday.

While I haven’t been posting much creative stuff lately, I have been spending my free time helping with something festive and fun; a Winter Craft Fair. When my darling, little children’s school was looking for a volunteer to help lead the Winter Craft Fair, I raised my hand.

After all, helping kids create cool, giftable stuff is super fun.

It's also a great way to make the holidays the most creative yet!

And giving time back to a community that gives so much is a great gift for all.

Speaking of communities, to give back to you, over the next few weeks, I will be sharing with you similar winter craft ideas for kids of all ages.

So, get your salad spinner ready, go rummage through the closet for the glitter, and fire up a hot glue gun because winter inspired crafts, that are going knock your mittens off, are coming your way.

Let’s start with something simple, one beautiful snowflake. Remember cutting these out when we were kids? The perfect little one-of-a-kind darlings are sure to make anyone feel special.

Simple Snowflake

  • 1 white 8” coffee flitter

  • Scissors

Step 1: Fold the coffee filter in half, and then keep folding 4 more times.

Step 2: While the coffee filter is folded, cut into and cut out small shapes from the coffee filter.

Step 3: Unfold and admire your one-of-a-kind snowflake. Use it to decorate the top of a gift. Maybe make a few more and create some festive garland to hang on the mantle? The possibilities are more endless than the effort needed to see a polar bear in a snowstorm!

snowflake_7.jpg
snowflake_2.jpg
snowflake_wrapping_paper_1.jpg

My now 20-year-old nephew's snowflake popsicle ornament still hangs from the tree. He was just four or five years old when he gifted it to me wrapped in soft little green tissue paper and sprinkled white faux snow.

There is just something so special about snowflakes. They are so simple, so complicated and give so much over time.

Until tomorrow friends!

Here Is How To Magically Predict The Future.
vote_2.jpg

“Somewhere inside of all of us is the power to change the world.”

-Roald Dahl

What’s more accurate and useful than a crystal ball?

Voting.

Today, let’s step up to the ballot box and cast our vote.

It gives us magic to predict the future and the power to change the world.

vote_1.gif

Get out there and vote Great American Friends!

Andra Webertoday, yet
Here Is One Last Minute Scary Good Halloween Recipe.
spider_cookies_sq.jpg

Halloween is tomorrow. Are we trying to find time to add a few final stitches to a costume?

Hopefully.

Are we swooping down to a store to search for one last spooky Halloween trick?

Probably.

Are we trying to hypnotize ourselves into forgetting about the giant overflowing candy caldron sitting in our office?

Yes! Absolutely. Without a doubt. No question.

Because who can resist a ridiculously delicious, saccharine-saturated, gigantic bowl of FREE candy.

No one.

Unless there is a better option.

Like these Scary Good Tarantula Cookies. Thanks to my lovely friend Sashi, who is always looking for better-for-you eating options, she created the recipe base for these cookies. They are chocked full of amazingly healthy ingredients that will make you and your kiddos forget all about the hauntingly sweet Tootsie Pops and Snicker Bars sitting in that giant Halloween candy bowl.

In two big bites, these cookies will give all goblins the best energy to keep the Halloween fun crawling with no sugar crash!

halloween_spider_cookies.jpg

Scary Good Tarantula Cookies

Ingredients

  • 2 cups old-fashioned oats

  • 1 cup sunflower seeds

  • 1/4 cup cacao powder

  • 1/4 teaspoon salt

  • 1/2 cup dried cranberries

  • 1/2 cup raw & unfiltered honey

  • 1/2 cup sun butter or nut butter

  • 1 egg

  • cacao nibs, chocolate chips and candy eyes (optional)

  • About 30 stick pretzels cut in half

Step 1: Preheat oven to 350 degrees Fahrenheit. Prepare a cookie sheet with parchment. Place the oats, sunflower seeds, cacao powder, salt, and cranberries in a blender or a food processor. Pulse to combine.

Step 2: In a large bowl, combine the oat mixture, honey, sun butter or nut butter and egg. With your hands or a cookie scoop, create approximately 2-inch balls of cookie dough. Place each ball on the cookie sheet. If desired, top each with cacao nibs, chocolate chips, and candy eyes.

Step 3: Place the cookie sheet in the oven and bake for 10-12 minutes. After removing the pan from the oven, for each cookie, immediately push four pretzels into the side of the cookie. Repeat on the other side, so each spider cookie has eight legs. Let cool completely.

halloween_spider_cookies_1.jpg
healthy_halloween_cookies.jpg
halloween_spider_cookies_2.jpg
healthy_spider_cookies_8.jpg
spider_cookies_5.jpg

These cookies are so good, they might just creepy crawl away faster than a cat in a room full of rocking chairs.

Until tomorrow Healthy Halloween Friends!

Andra Webertoday, yet